> ## Documentation Index
> Fetch the complete documentation index at: https://docs.payglocal.in/llms.txt
> Use this file to discover all available pages before exploring further.
# UPI
> How UPI works on PayGlocal hosted PayCollect checkout in India — customer experience, screenshots, and funds flow.
## When to Use This Guide
Read this page if you accept **INR** payments in India and route customers through **PayCollect** (hosted checkout). It explains the **UPI** rail at a product level. For request payloads, nested responses, and headers specific to **UPI Intent**, use [UPI Intent](/api-reference/payment/upi-intent).
***
## What Is UPI Here?
Think of **UPI** as “pay straight from a bank account using a phone app,” managed by India’s **NPCI** network. Your shopper does **not** type card numbers on your site. Instead, they land on a **PayGlocal-hosted** checkout: they pick **UPI**, scan a **one-time QR** (or approve in an app), enter their UPI PIN in **their own** bank app, and the debit happens on banking rails you never touch.
***
## How it gets paid
The payment is completed on PayGlocal’s hosted checkout. Your server starts the flow, PayGlocal shows the UPI experience, the customer approves the request in their bank app, and the UPI/NPCI network moves the money.
* Your backend opens a PayCollect session for UPI and receives a hosted `redirectUrl`.
* The shopper chooses UPI on the PayGlocal page and generates a QR or follows the in-app approval path.
* They complete the payment in their bank app using UPI PIN; your merchant site never sees the PIN or bank credentials.
* NPCI/bank settlement moves the funds, and PayGlocal updates the hosted checkout with success or failure.
* PayGlocal then notifies your server via `merchantCallbackURL`, and you can also verify the outcome by polling Get Status.
* Actual settlement into your account happens later through your normal bank payout process.
This is the same product-level path as PayCollect: PayGlocal mediates the checkout; UPI apps move the money; your backend receives a trusted result.
***
## What your customer sees (step by step)
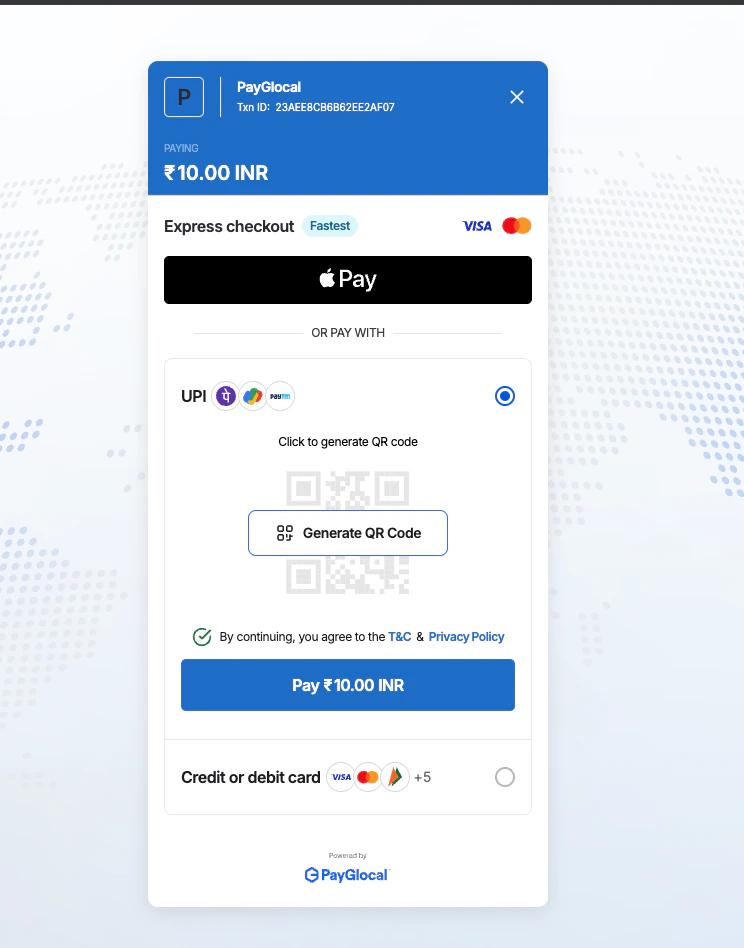
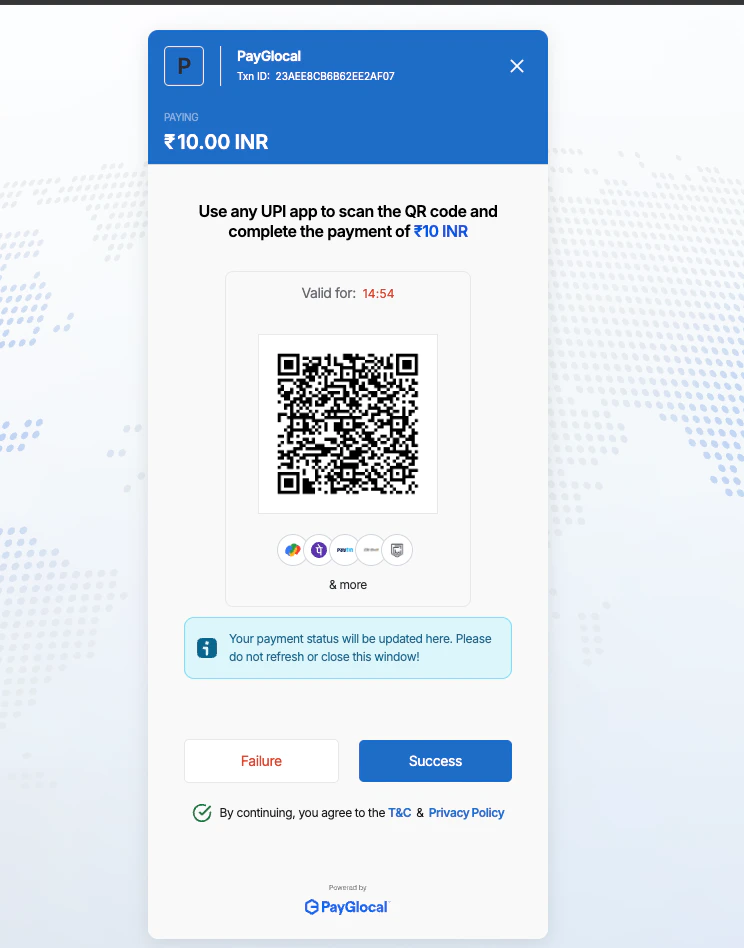
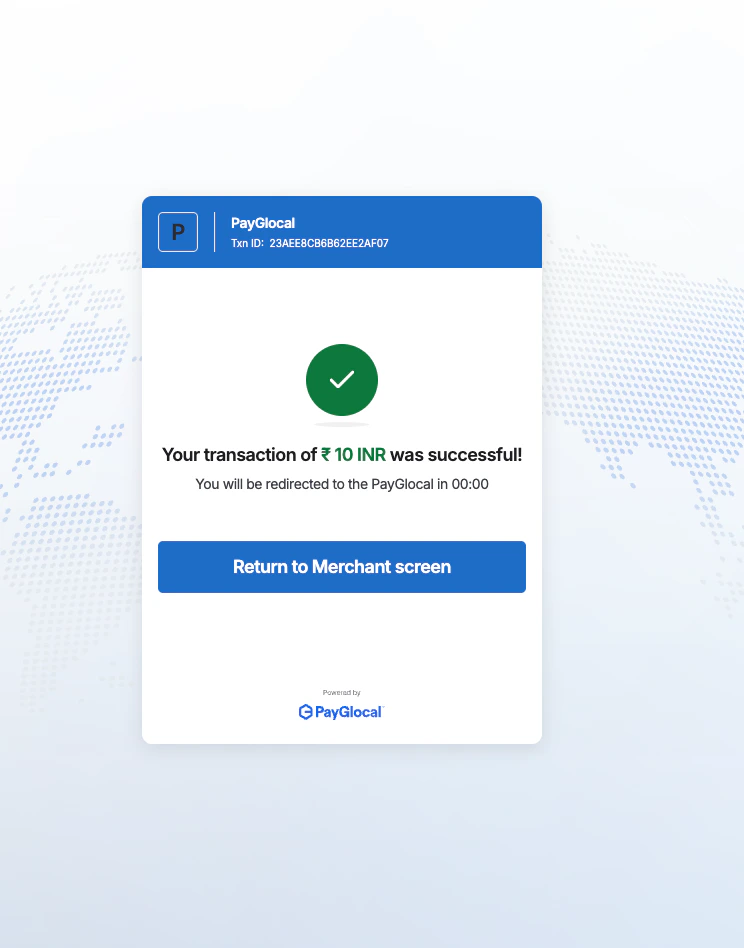
Each step below matches what you see in the **UAT screenshots** (blue header, white body). In production the layout stays the same; only copy and branding may differ.
Screenshots are from **UAT**. The **Txn ID** in the header is your `merchantTxnId` so support can match a screenshot to a server log line.
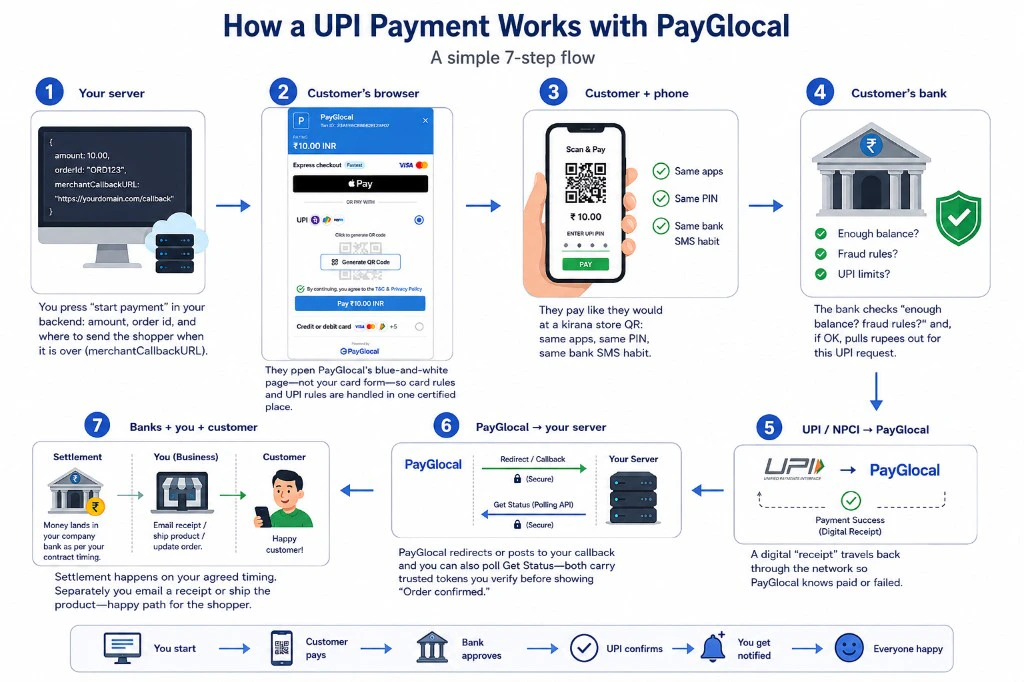
The infographic below is one **end-to-end view** of the same journey: your server starts the payment, the customer pays on PayGlocal’s hosted page with their usual UPI habit, the bank and NPCI move the money message, PayGlocal tells your backend, then settlement and your “order complete” moment. The **numbered steps under it** walk through **real checkout screenshots** for the parts the shopper actually sees on screen.
### Step 1 — Pick “UPI” on the PayGlocal checkout
The shopper leaves your cart and opens PayGlocal’s page. They see the amount (for example **₹10.00 INR**) and the transaction id in the header—**that id is the reference you sent as** `merchantTxnId`. They tap **UPI** so the page knows they want a bank-app payment instead of only cards.
 ***
### Step 2 — Tap “Generate QR Code” (or follow the on-screen UPI path)
On the same screen, PayGlocal asks them to **create the QR**. After they tap **Generate QR Code**, a **fresh QR** appears. A **countdown timer** may show how long that QR stays valid—if it expires, they generate a new one. (Some flows may deep-link into an app instead of QR; the idea is the same: PayGlocal prepares the collect request, the bank app finishes it.)
***
### Step 3 — Open PhonePe, Google Pay, Paytm, or any UPI app and pay
They scan the QR **or** complete the in-app approval flow. The money request shows the right amount; they confirm with their **UPI PIN inside their bank’s app**. Your website never sees that PIN.
***
### Step 2 — Tap “Generate QR Code” (or follow the on-screen UPI path)
On the same screen, PayGlocal asks them to **create the QR**. After they tap **Generate QR Code**, a **fresh QR** appears. A **countdown timer** may show how long that QR stays valid—if it expires, they generate a new one. (Some flows may deep-link into an app instead of QR; the idea is the same: PayGlocal prepares the collect request, the bank app finishes it.)
***
### Step 3 — Open PhonePe, Google Pay, Paytm, or any UPI app and pay
They scan the QR **or** complete the in-app approval flow. The money request shows the right amount; they confirm with their **UPI PIN inside their bank’s app**. Your website never sees that PIN.
 ***
### Step 4 — Wait on the PayGlocal page while status catches up
They should **stay on this tab**. The page shows a short note that **payment status will update here**—that is PayGlocal listening for the bank’s answer. In **Sandbox / UAT** you may also see big **Success** and **Failure** buttons: those only exist so developers can **pretend** a bank result and test your `merchantCallbackURL` without a real rupee moving.
***
### Step 5 — “Paid” screen, then back to your shop
When the payment succeeds, they see a **green check** and the amount in words they understand (“your transaction of … was successful”). After a short countdown, PayGlocal sends them to the **`merchantCallbackURL`** you configured—your site shows the **order confirmation** or “try again” page.
***
### Step 4 — Wait on the PayGlocal page while status catches up
They should **stay on this tab**. The page shows a short note that **payment status will update here**—that is PayGlocal listening for the bank’s answer. In **Sandbox / UAT** you may also see big **Success** and **Failure** buttons: those only exist so developers can **pretend** a bank result and test your `merchantCallbackURL` without a real rupee moving.
***
### Step 5 — “Paid” screen, then back to your shop
When the payment succeeds, they see a **green check** and the amount in words they understand (“your transaction of … was successful”). After a short countdown, PayGlocal sends them to the **`merchantCallbackURL`** you configured—your site shows the **order confirmation** or “try again” page.
 ***
## How money actually moves (simple picture)
**Plain fact:** the shopping cart in the browser does **not** hold cash. Only **banks** move rupees. PayGlocal’s job is to **stand in the middle**: start a safe session, show the checkout you saw above, talk to **UPI / NPCI**, then **tell your servers** what happened using `gid`, `merchantTxnId`, callbacks, and status APIs.
### Diagram — all seven beats on one line
The image is a **timeline**: read **1 → 6** across the top for what happens in a few seconds around the payment; **step 7** is what accountants call **settlement** (often later in the day or next batch—not the same blink as “success” on screen).
***
## How money actually moves (simple picture)
**Plain fact:** the shopping cart in the browser does **not** hold cash. Only **banks** move rupees. PayGlocal’s job is to **stand in the middle**: start a safe session, show the checkout you saw above, talk to **UPI / NPCI**, then **tell your servers** what happened using `gid`, `merchantTxnId`, callbacks, and status APIs.
### Diagram — all seven beats on one line
The image is a **timeline**: read **1 → 6** across the top for what happens in a few seconds around the payment; **step 7** is what accountants call **settlement** (often later in the day or next batch—not the same blink as “success” on screen).
 ### Same story in everyday words
| Step | Who acts | What a non‑engineer should picture |
| ----- | --------------------------- | ------------------------------------------------------------------------------------------------------------------------------------------------------------------------ |
| **1** | **Your server** | You press “start payment” in your backend: amount, order id, and where to send the shopper when it is over (`merchantCallbackURL`). |
| **2** | **Customer’s browser** | They open PayGlocal’s blue-and-white page—not your card form—so card rules and UPI rules are handled in one certified place. |
| **3** | **Customer + phone** | They pay like they would at a kirana store QR: same apps, same PIN, same bank SMS habit. |
| **4** | **Customer’s bank** | The bank checks “enough balance? fraud rules?” and, if OK, **pulls rupees** out for this UPI request. |
| **5** | **UPI / NPCI → PayGlocal** | A digital “receipt” travels back through the network so PayGlocal knows **paid or failed**. |
| **6** | **PayGlocal → your server** | PayGlocal **redirects or posts** to your callback and you can also **poll Get Status**—both carry trusted tokens you verify before showing “Order confirmed.” |
| **7** | **Banks + you + customer** | **Settlement** (money landing in your company bank) follows your **contract timing**; separately you **email a receipt** or ship the product—happy path for the shopper. |
**Why step 7 feels slower:** authorization (steps 1–6) can be almost instant for the user, but **moving cleared funds between banks for your payout** is often a **batch** process—like clearing cheques overnight, not like handing cash across a counter.
***
## Next Step
Minimal and enriched PayCollect requests, initiation vs post-success status payloads, headers, and callback notes.
### Same story in everyday words
| Step | Who acts | What a non‑engineer should picture |
| ----- | --------------------------- | ------------------------------------------------------------------------------------------------------------------------------------------------------------------------ |
| **1** | **Your server** | You press “start payment” in your backend: amount, order id, and where to send the shopper when it is over (`merchantCallbackURL`). |
| **2** | **Customer’s browser** | They open PayGlocal’s blue-and-white page—not your card form—so card rules and UPI rules are handled in one certified place. |
| **3** | **Customer + phone** | They pay like they would at a kirana store QR: same apps, same PIN, same bank SMS habit. |
| **4** | **Customer’s bank** | The bank checks “enough balance? fraud rules?” and, if OK, **pulls rupees** out for this UPI request. |
| **5** | **UPI / NPCI → PayGlocal** | A digital “receipt” travels back through the network so PayGlocal knows **paid or failed**. |
| **6** | **PayGlocal → your server** | PayGlocal **redirects or posts** to your callback and you can also **poll Get Status**—both carry trusted tokens you verify before showing “Order confirmed.” |
| **7** | **Banks + you + customer** | **Settlement** (money landing in your company bank) follows your **contract timing**; separately you **email a receipt** or ship the product—happy path for the shopper. |
**Why step 7 feels slower:** authorization (steps 1–6) can be almost instant for the user, but **moving cleared funds between banks for your payout** is often a **batch** process—like clearing cheques overnight, not like handing cash across a counter.
***
## Next Step
Minimal and enriched PayCollect requests, initiation vs post-success status payloads, headers, and callback notes.