> ## Documentation Index
> Fetch the complete documentation index at: https://docs.payglocal.in/llms.txt
> Use this file to discover all available pages before exploring further.
# Key & Credential Management
> Understand what credentials PayGlocal needs, why each one matters, and how to get them from your GCC dashboard.
Not logged into GCC yet? Start at [PayGlocal Dashboards](/getting-started/payglocal-dashboards) first.
## Why Do You Need Credentials?
PayGlocal uses a **JWT token-based integration model** for every API call. Before your payment request reaches PayGlocal's servers, it goes through two steps:
Your payment data is encrypted using **PayGlocal's public key** so only PayGlocal can read it.
This produces a **JWE token** — a 5-part encrypted blob in the format `header.encryptedKey.iv.ciphertext.tag`.
The JWE is then signed using **your private key** to prove the request came from you.
This produces a **JWS token** — a 3-part signed token in the format `header.payload.signature`.
The JWS goes into the `x-gl-token-external` header. The JWE goes in the request body.
PayGlocal verifies your signature, decrypts the payload, and processes the payment.
**This is why credentials exist.** Each of the five values plays a specific role in this flow:
| Credential | Role in the flow |
| -------------------------- | -------------------------------------------------------------- |
| **PayGlocal's Public Key** | Encrypts your payload → only PayGlocal can decrypt |
| **Your Private Key** | Signs the request → proves it came from you |
| **Public Key ID (KID)** | Tells PayGlocal which key was used to encrypt |
| **Private Key ID (KID)** | Tells PayGlocal which key pair to verify the signature against |
| **Merchant ID (MID)** | Identifies your merchant account on every API call |
Your **private key is downloaded once** and is not stored by PayGlocal. Keep it in a secrets manager — never commit it to source control or send it over email. If lost, you must regenerate a new key pair and update all integrations.
Credentials are **environment-specific**. Generate and copy a separate set in **UAT** and in **Production** — keys, Key IDs, and Merchant ID from one environment do not work in the other.
***
## How to Get Each Credential
### Merchant ID (MID)
Open [GCC UAT](https://gcc.uat.payglocal.in) or [GCC Production](https://gcc.prod.payglocal.in).
Click your profile icon in the top-right corner of the dashboard, then click **My Account**.
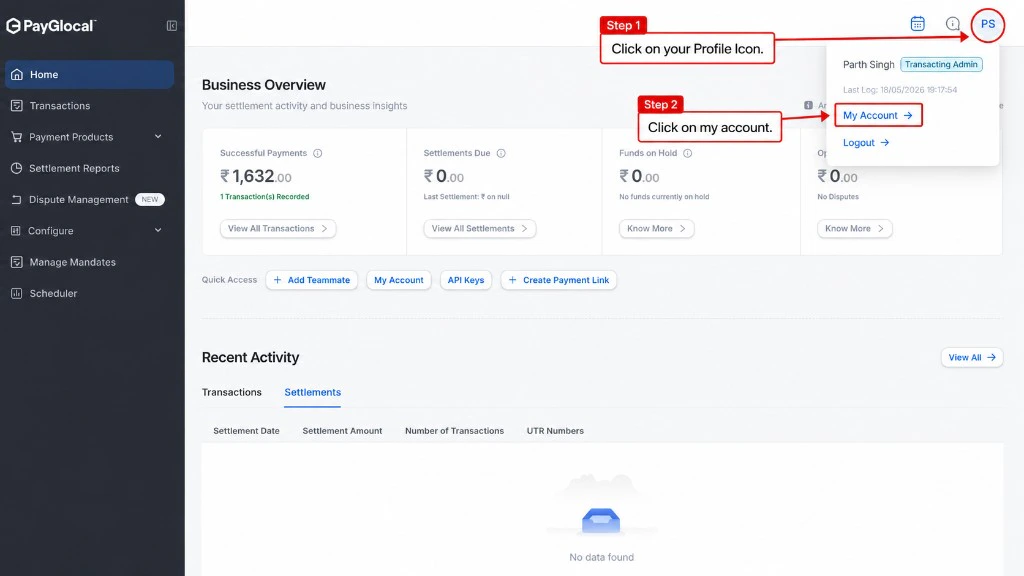 From the headings, click **TID Details**.
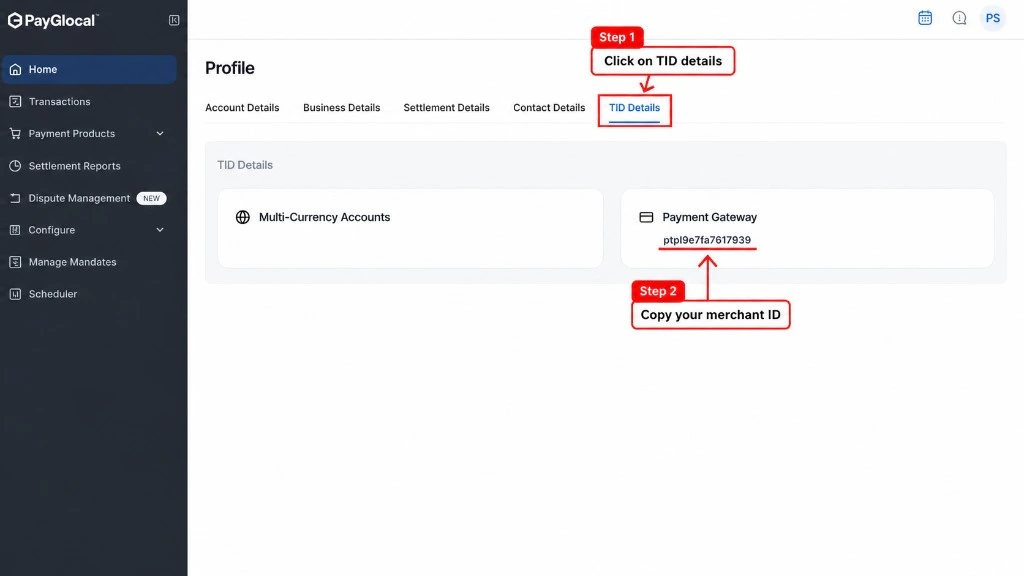 Under the **Payment Gateway** section, your **Merchant ID (MID)** is displayed. Copy it.
***
### Public Key & Private Key
Both keys are managed from the Key Management System in GCC. You'll download PayGlocal's public key first, then generate and download your own private key.
#### Downloading Public Key
In the **left sidebar**, click **Configure**.
Under the **Payment Gateway** section, your **Merchant ID (MID)** is displayed. Copy it.
***
### Public Key & Private Key
Both keys are managed from the Key Management System in GCC. You'll download PayGlocal's public key first, then generate and download your own private key.
#### Downloading Public Key
In the **left sidebar**, click **Configure**.
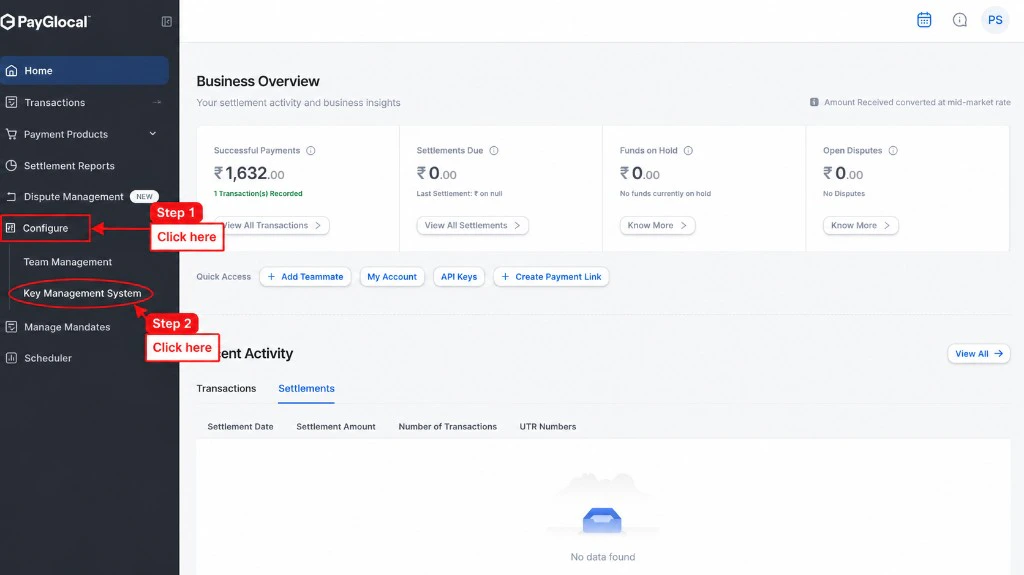 Then click **Key Management System**.
Find **PayGlocal Common Certificate** in the list and click **Download**.
Then click **Key Management System**.
Find **PayGlocal Common Certificate** in the list and click **Download**.
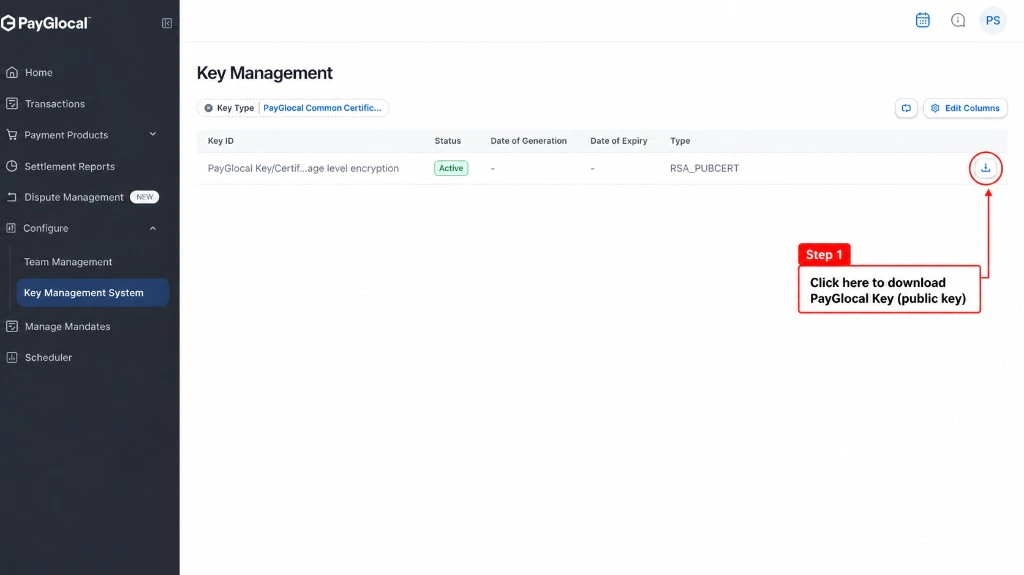 This is **PayGlocal's public key** — you'll use it to encrypt your JWE payload so only PayGlocal can decrypt it.
#### Downloading Private Key
In the same Key Management screen, click the **Key Type** dropdown filter.
This is **PayGlocal's public key** — you'll use it to encrypt your JWE payload so only PayGlocal can decrypt it.
#### Downloading Private Key
In the same Key Management screen, click the **Key Type** dropdown filter.
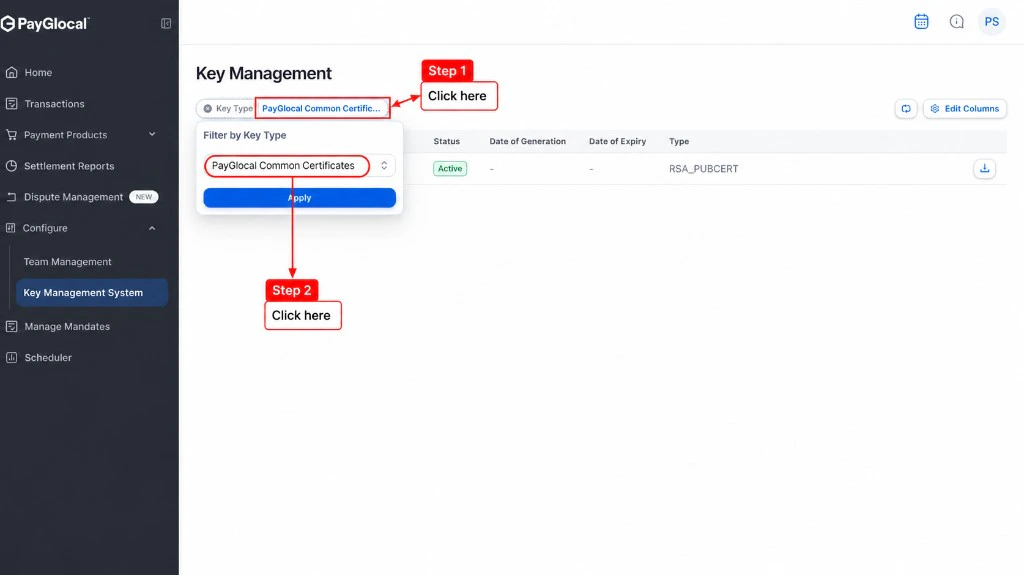 From the dropdown menu, select **RSA**.
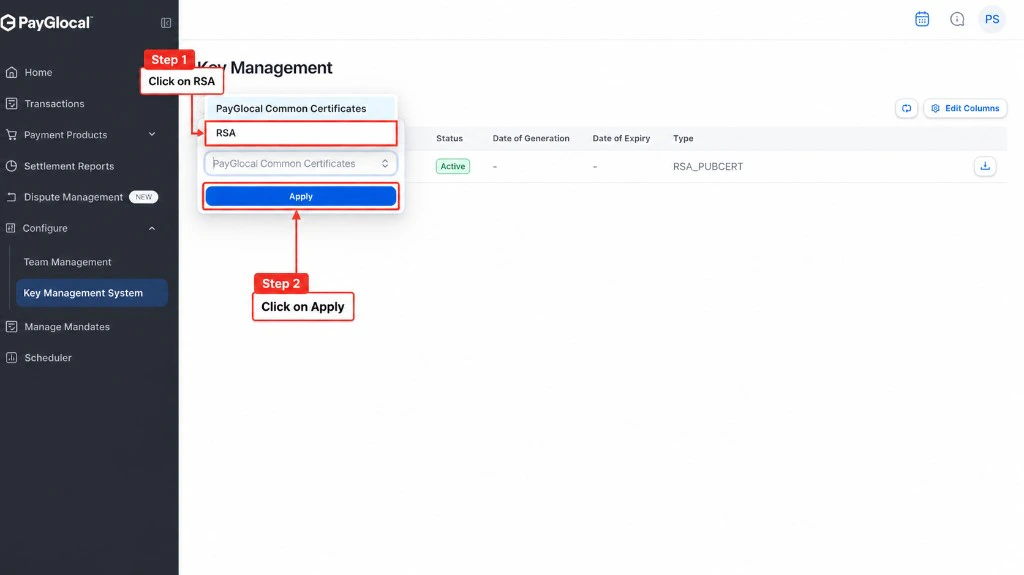 Then click **Apply**.
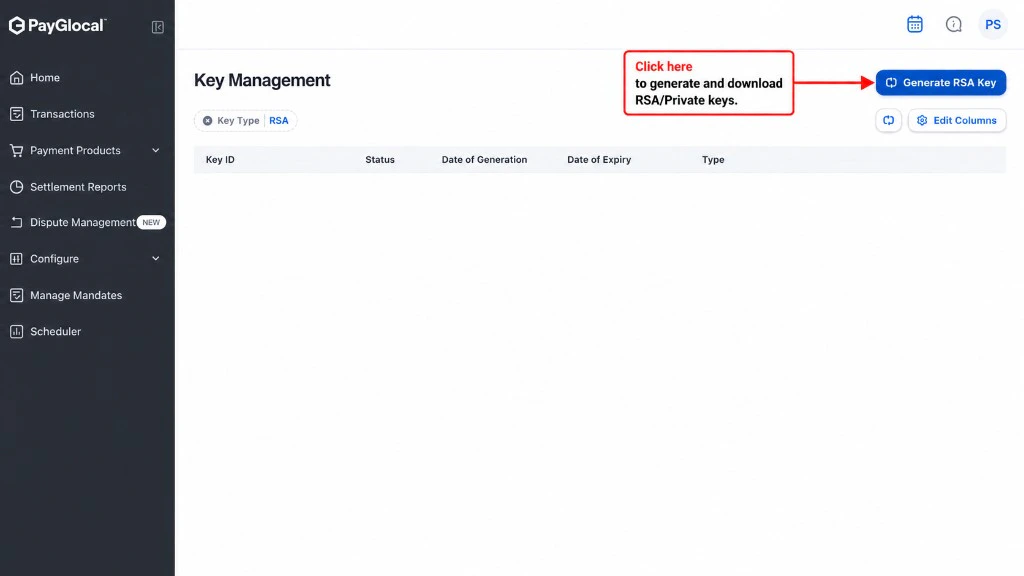
Click the **Generate RSA Key** button in the top-right corner. This creates a new RSA key pair.
Then click **Apply**.
Click the **Generate RSA Key** button in the top-right corner. This creates a new RSA key pair.
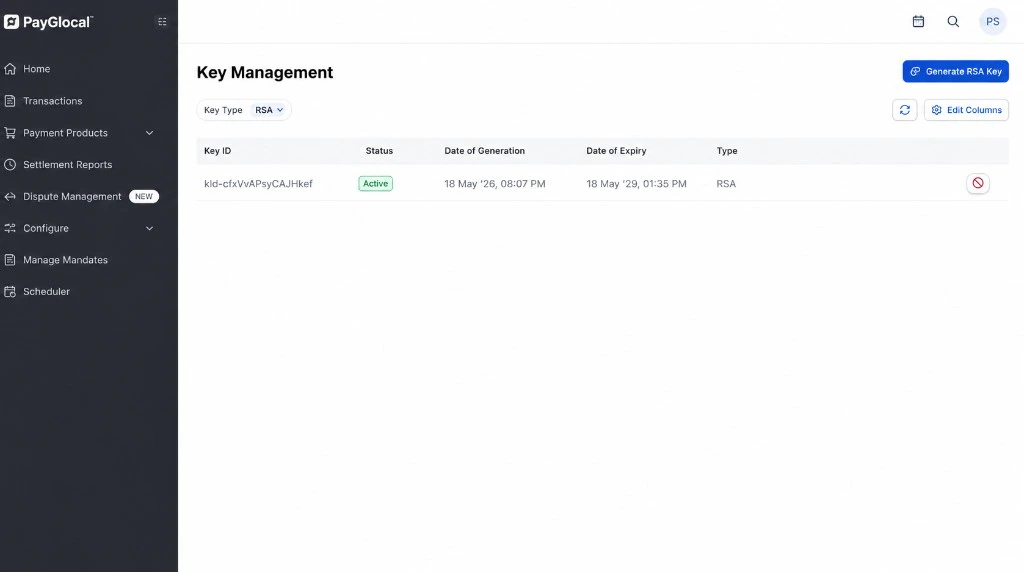
 Once the key is generated, you'll see it in the table. Click the **Download** icon to save your private key.
 **This is your only chance to download the private key.** PayGlocal does not store it. If you lose it, regenerate a new key pair and update all your integrations.
***
### Key IDs (Public KID & Private KID)
You don't have to hunt for Key IDs separately — each is embedded in the filename of the file you downloaded. The Private Key ID is also shown directly in GCC.
#### Fetching Public Key ID
The Public Key ID is embedded in the filename of **PayGlocal's certificate** you downloaded from GCC.
Navigate to the folder where the **PayGlocal public key** was downloaded (usually your Downloads folder).
Look at the filename of the downloaded `.pem` file. It follows this pattern:
```
[PUBLIC_KEY_ID]_[rest-of-filename].pem
```
**This is your only chance to download the private key.** PayGlocal does not store it. If you lose it, regenerate a new key pair and update all your integrations.
***
### Key IDs (Public KID & Private KID)
You don't have to hunt for Key IDs separately — each is embedded in the filename of the file you downloaded. The Private Key ID is also shown directly in GCC.
#### Fetching Public Key ID
The Public Key ID is embedded in the filename of **PayGlocal's certificate** you downloaded from GCC.
Navigate to the folder where the **PayGlocal public key** was downloaded (usually your Downloads folder).
Look at the filename of the downloaded `.pem` file. It follows this pattern:
```
[PUBLIC_KEY_ID]_[rest-of-filename].pem
```
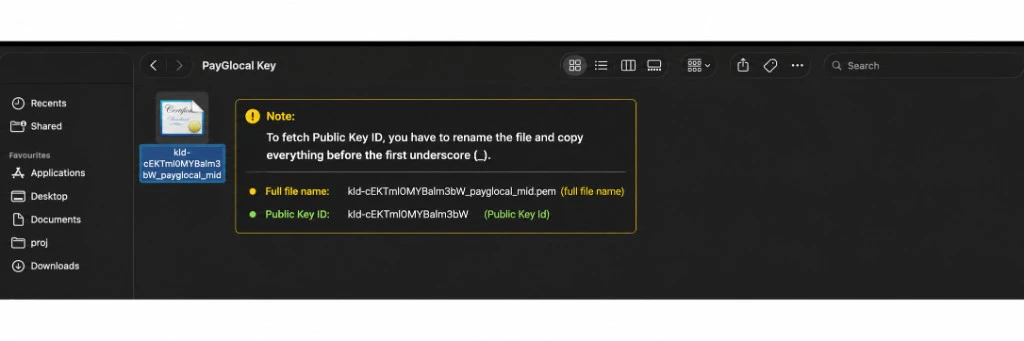 The **Public Key ID** is everything before the first underscore (`_`).
**Example:**
* Full filename: `834hinrh-8r0n-4657-34nn-fnjhjre33uur_glocal.pem`
* Public Key ID (KID): `834hinrh-8r0n-4657-34nn-fnjhjre33uur`
**Pro tip:** Right-click the file → Rename → copy just the Key ID part (everything before the first `_`), then press Escape so you don't actually rename the file.
#### Fetching Private Key ID
Unlike the Public Key ID, your **Private Key ID can be fetched directly from the GCC dashboard** where you generated the RSA key.
Navigate back to **Configure → Key Management System** and filter by **RSA** (where you generated your private key).
In the Key Management table, you'll see your generated RSA key listed with its **Key ID** in the first column.
The **Public Key ID** is everything before the first underscore (`_`).
**Example:**
* Full filename: `834hinrh-8r0n-4657-34nn-fnjhjre33uur_glocal.pem`
* Public Key ID (KID): `834hinrh-8r0n-4657-34nn-fnjhjre33uur`
**Pro tip:** Right-click the file → Rename → copy just the Key ID part (everything before the first `_`), then press Escape so you don't actually rename the file.
#### Fetching Private Key ID
Unlike the Public Key ID, your **Private Key ID can be fetched directly from the GCC dashboard** where you generated the RSA key.
Navigate back to **Configure → Key Management System** and filter by **RSA** (where you generated your private key).
In the Key Management table, you'll see your generated RSA key listed with its **Key ID** in the first column.
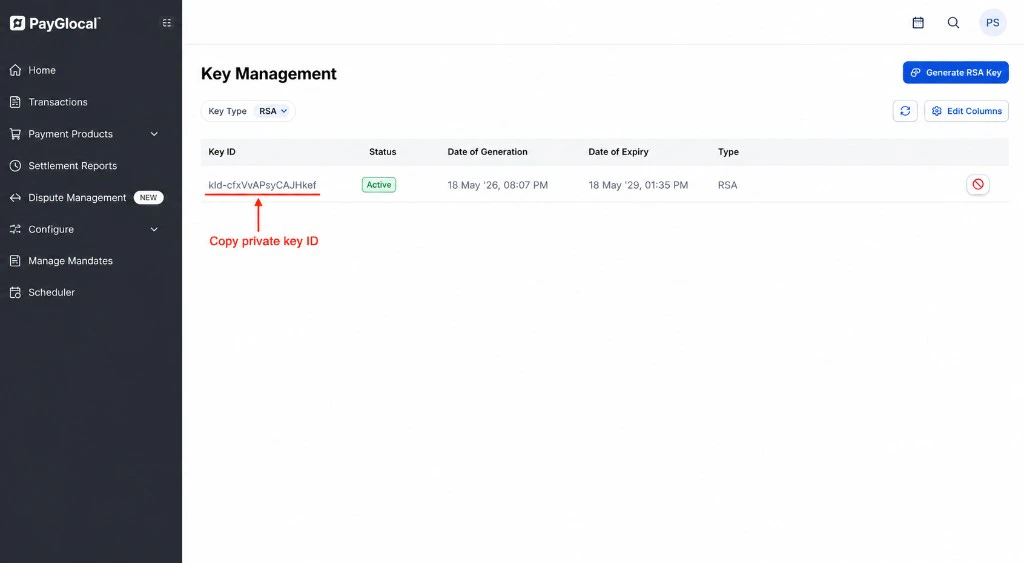 Copy the **Key ID** displayed in the table — this is your **Private Key ID**.
You can also extract it from the downloaded filename, which follows the pattern `_.pem`: the part **before** the first `_` is your Private Key ID, and the part **after** it is your Merchant ID (MID). The dashboard method is easier since the Key ID is already displayed.
**Filename:**
```
834hinrh-8r0n-4657-34nn-fnjhjre33uur_glocal.pem
```
**Public Key ID:**
```
834hinrh-8r0n-4657-34nn-fnjhjre33uur
```
✅ Everything before the first `_`
**Filename:**
```
884hiurh-8e0b-4907-38nn-fuerikejr89_paygmerchant.pem
```
**Private Key ID:**
```
884hiurh-8e0b-4907-38nn-fuerikejr89
```
✅ Everything before the first `_`
***
## Quick Reference
| # | Credential | Where to get it |
| - | -------------- | ------------------------------------------------------------------------------------ |
| 1 | Merchant ID | GCC → Profile icon → My Account → TID Details → Payment Gateway |
| 2 | Public Key | GCC → Configure → Key Management → PayGlocal Common Certificate |
| 3 | Private Key | GCC → Configure → Key Management → Generate RSA Key |
| 4 | Public Key ID | Public key `.pem` filename — text before the first `_` |
| 5 | Private Key ID | GCC Key Management table, or private key `.pem` filename — text before the first `_` |
***
## Next Steps
JWS signing mechanics, key rotation, and environments.
Choose between No-Code and API integration based on how your business collects payments.
Questions? Reach out at [merchant.support@payglocal.in](mailto:merchant.support@payglocal.in).
Copy the **Key ID** displayed in the table — this is your **Private Key ID**.
You can also extract it from the downloaded filename, which follows the pattern `_.pem`: the part **before** the first `_` is your Private Key ID, and the part **after** it is your Merchant ID (MID). The dashboard method is easier since the Key ID is already displayed.
**Filename:**
```
834hinrh-8r0n-4657-34nn-fnjhjre33uur_glocal.pem
```
**Public Key ID:**
```
834hinrh-8r0n-4657-34nn-fnjhjre33uur
```
✅ Everything before the first `_`
**Filename:**
```
884hiurh-8e0b-4907-38nn-fuerikejr89_paygmerchant.pem
```
**Private Key ID:**
```
884hiurh-8e0b-4907-38nn-fuerikejr89
```
✅ Everything before the first `_`
***
## Quick Reference
| # | Credential | Where to get it |
| - | -------------- | ------------------------------------------------------------------------------------ |
| 1 | Merchant ID | GCC → Profile icon → My Account → TID Details → Payment Gateway |
| 2 | Public Key | GCC → Configure → Key Management → PayGlocal Common Certificate |
| 3 | Private Key | GCC → Configure → Key Management → Generate RSA Key |
| 4 | Public Key ID | Public key `.pem` filename — text before the first `_` |
| 5 | Private Key ID | GCC Key Management table, or private key `.pem` filename — text before the first `_` |
***
## Next Steps
JWS signing mechanics, key rotation, and environments.
Choose between No-Code and API integration based on how your business collects payments.
Questions? Reach out at [merchant.support@payglocal.in](mailto:merchant.support@payglocal.in).