> ## Documentation Index
> Fetch the complete documentation index at: https://docs.payglocal.in/llms.txt
> Use this file to discover all available pages before exploring further.
# Invoice Link
> Generate and share professional payment invoices with customers digitally.
## What is an Invoice Link?
**Invoice Links** allow merchants to generate and share professional payment invoices with customers digitally. These invoices can include complete transaction details such as invoice number, due date, item details, tax, discounts, billing details, merchant notes, and more.
The customer receives a secure invoice link through supported communication channels and can complete the payment directly using the hosted payment page.
## When to Use Invoice Link?
Invoice Links are especially useful for:
* **International and domestic customer payments**
* **Service-based businesses** requiring detailed billing
* **Manual order collections** with professional invoicing
* **Professional invoicing and payment tracking**
* **Businesses requiring detailed billing information**
## How to Create an Invoice Link
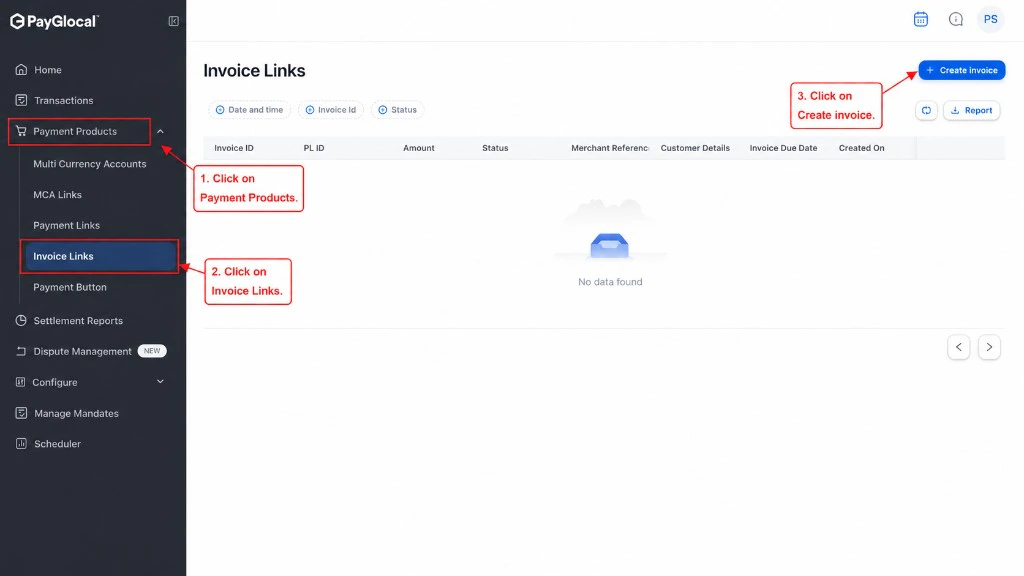
Log in to the [GCC dashboard](https://merchant.payglocal.in), click on **Payment Products** in the left sidebar, then select **Invoice Links**.
Click the **+ Create invoice** button in the top right corner to open the invoice creation form.
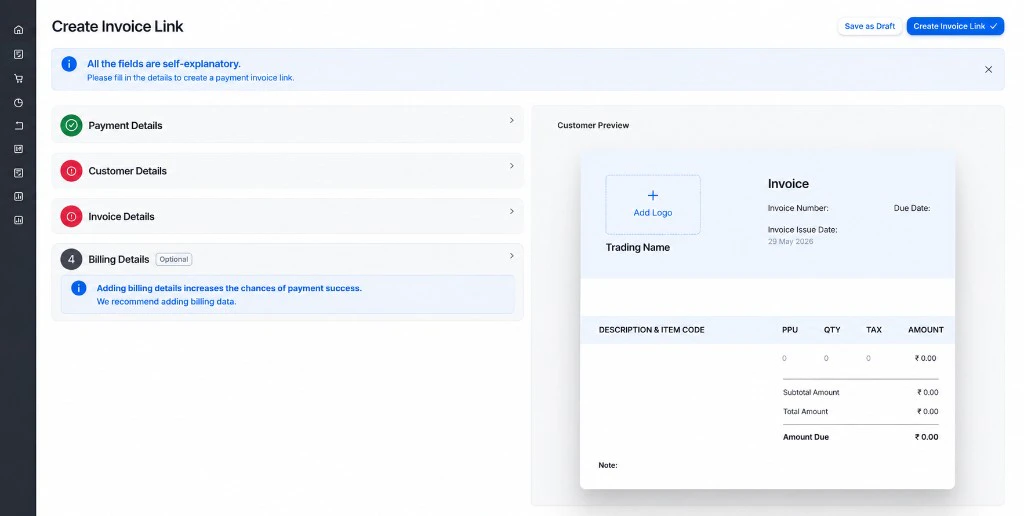
Start by filling in the **Payment Details** section:
**Required Fields:**
* **Select Currency**: Choose the invoice currency (e.g., FJD \$, INR, USD)
* **Amount**: Enter the invoice amount
As you fill in these details, you'll see a **live preview** of how your invoice will look on the right side of the screen, showing:
* Trading Name
* Invoice preview layout
* Description & Item Code
* PPU (Price Per Unit), QTY, TAX, AMOUNT columns
Continue filling in the remaining sections:
**Section 2: Customer Details**
* Customer name, email, phone, and address
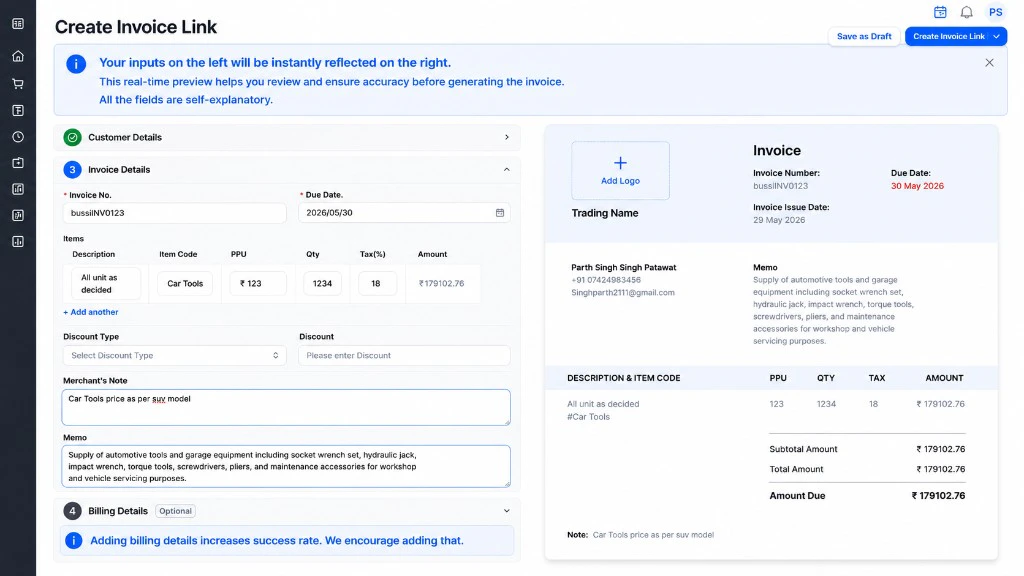
**Section 3: Invoice Details** (All fields are self-explanatory)
* **Invoice No.**: Unique invoice identifier (e.g., 12343)
* **Due Date**: Payment deadline (e.g., 2026/06/21)
* **Items**: Add line items with:
* Description (e.g., "payment for Jacket")
* Item Code (e.g., 12345)
* PPU (Price Per Unit, e.g., \$100)
* Qty (Quantity, e.g., 1)
* Tax(%) (e.g., 18)
* Amount (automatically calculated, e.g., \$118.00)
* **Discount Type**: Select discount type
* **Discount**: Enter discount amount if applicable
* **Merchant's Note**: Add notes (e.g., "Payment for jacket")
* **Memo**: Additional information
Click **Create Invoice Link** to generate and share the invoice. You can also **Save as Draft** to finish later.
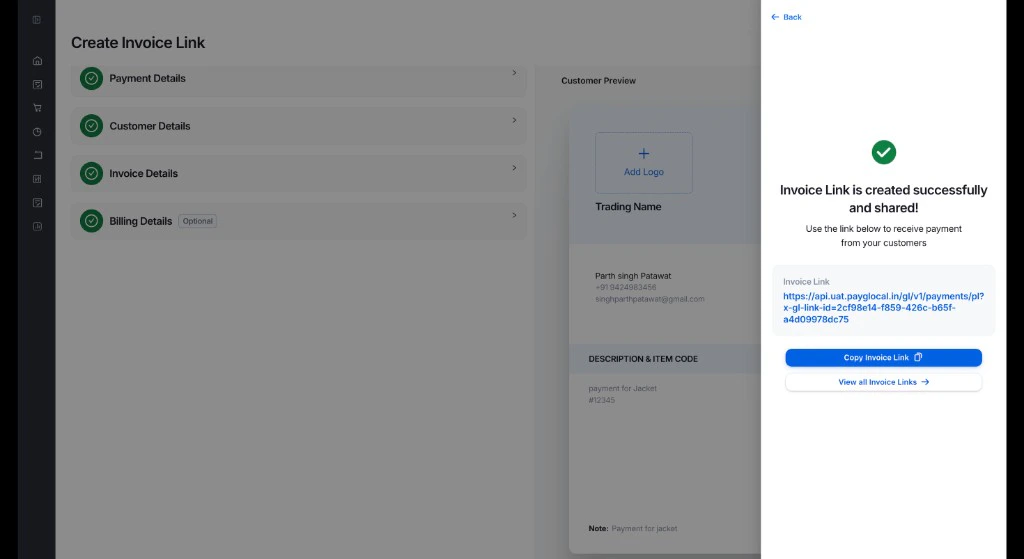
After creating the invoice, you'll see a success confirmation:
The success modal shows:
* **Invoice Link is created successfully and shared!**
* The generated invoice link URL that you can copy
* **Copy Invoice Link** button to easily copy the link
* **View all Invoice Links** option to see your invoice dashboard
## Customer Notifications
**Notification Channels**:
* **International Customers**: Notifications are sent via **Email only**
* **Domestic Customers** (India): Notifications are sent via both **Email and SMS**
Customers receive notifications for invoice creation, payment reminders, and payment confirmation.
## Customer Experience
When a customer receives an invoice link:
1. **Receives Invoice**: Customer gets the invoice link via email or SMS
2. **Views Invoice**: Customer opens the link and sees the professional invoice with all details
3. **Reviews Details**: Customer reviews items, amounts, tax, and billing information
4. **Makes Payment**: Customer clicks to pay and is directed to PayGlocal's secure checkout
5. **Completes Payment**: Customer completes payment using their preferred method
6. **Gets Receipt**: Customer receives payment confirmation and updated invoice
## Key Differences from Payment Link
| Feature | Invoice Link | Payment Link |
| ------------ | ----------------------------- | ---------------------- |
| **Purpose** | Professional invoicing | Quick payment requests |
| **Details** | Comprehensive billing info | Basic payment details |
| **Items** | Multiple line items | Single amount |
| **Preview** | Live invoice preview | No preview |
| **Best For** | B2B, services, formal billing | B2C, quick payments |
## Next Steps
For quick payment requests without detailed invoicing
For dynamic amount payments on your website
Set up real-time payment notifications
Explore more dashboard features
## Support
* **Business and invoicing questions**: Contact your PayGlocal account manager
* **Technical issues**: Email [merchant.support@payglocal.in](mailto:merchant.support@payglocal.in)
* **Dashboard access**: Reach out to your account manager