> ## Documentation Index
> Fetch the complete documentation index at: https://docs.payglocal.in/llms.txt
> Use this file to discover all available pages before exploring further.
# Payment Button
> Embed payment buttons on your website for dynamic amount payments.
## What is a Payment Button?
A **Payment Button** is a no-code solution that allows you to add a payment button to your website without any API integration. When you create a payment button in the GCC dashboard, you receive JavaScript and HTML scripts that you can simply paste into your website.
## When to Use Payment Button?
Payment Button is ideal when:
* **Dynamic Amounts**: The payment amount needs to be entered by the customer (not fixed)
* **Quick Website Integration**: You want to add payment functionality without backend development
* **No API Knowledge Required**: You can embed payments by just copying and pasting code
Unlike Payment Links (which have fixed amounts), Payment Buttons allow customers to enter the amount they want to pay.
## How to Create a Payment Button
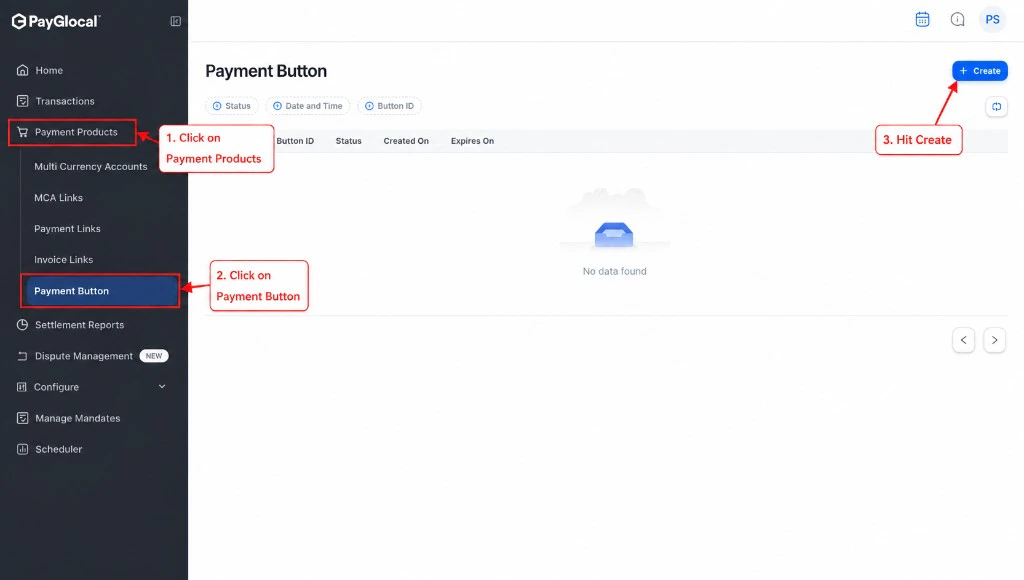
Log in to the [GCC dashboard](https://merchant.payglocal.in), click on **Payment Products** in the left sidebar, then select **Payment Button**.
Click the **Create** button in the top right corner to open the payment button creation form.
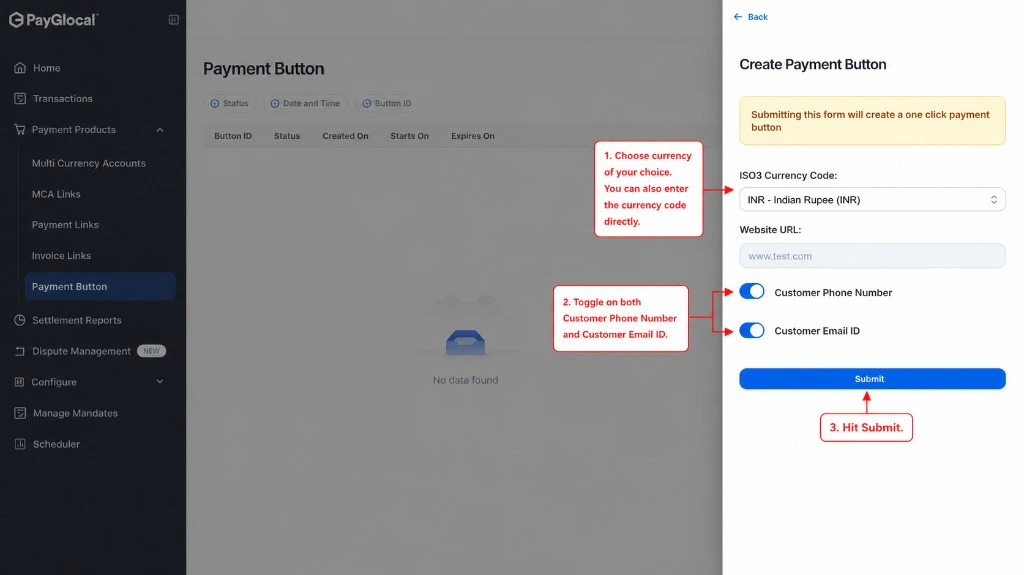
Fill in the required details:
**Configuration Options:**
* **ISO3 Currency Code**: Select the currency (e.g., INR for Indian Rupee)
* **Website URL**: Enter your website URL where the button will be embedded
* **Customer Phone Number**: Toggle on/off to collect customer phone number
* **Customer Email ID**: Toggle on/off to collect customer email
Click the **Submit** button to generate your payment button.
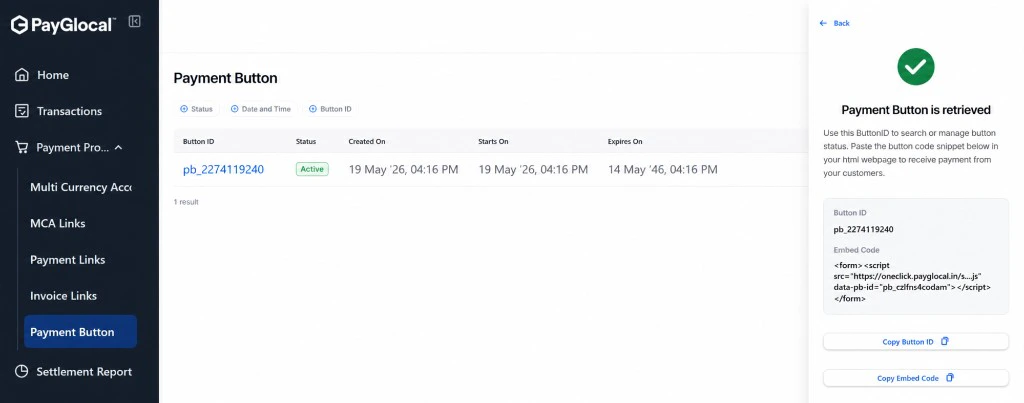
After submission, open the button from the **Payment Button** dashboard. The **Payment Button is retrieved** panel shows your **Button ID** and **Embed Code**.
* Click **Copy Button ID** to save the button reference for search and status checks
* Click **Copy Embed Code** and paste the snippet into your website HTML where customers will pay
1. Copy the JavaScript script and add it to your website
2. Copy the HTML button code and place it where you want the button
3. Test the button to ensure it works correctly
4. The customer will be able to enter the payment amount when they click the button
## How Payment Button Works
When a customer clicks your payment button:
1. **Button Click**: Customer clicks the payment button on your website
2. **Enter Amount**: Customer enters the payment amount (dynamic)
3. **Enter Details**: Customer fills in required information (email/phone if enabled)
4. **Payment Page**: Customer is directed to PayGlocal's secure checkout
5. **Complete Payment**: Customer completes payment using their preferred method
6. **Confirmation**: Customer receives payment confirmation and returns to your website
## Customer Experience
 *Screenshot showing customer entering amount and making payment - Coming soon*
## Managing Payment Buttons
From the Payment Button dashboard, you can:
* **View All Buttons**: See all payment buttons you've created
* **Check Status**: Monitor which buttons are active
* **View Transactions**: See all payments made through each button
* **Edit Button**: Update button configuration
* **Enable/Disable**: Activate or deactivate buttons as needed
## Button Embed Preview
*Screenshot showing customer entering amount and making payment - Coming soon*
## Managing Payment Buttons
From the Payment Button dashboard, you can:
* **View All Buttons**: See all payment buttons you've created
* **Check Status**: Monitor which buttons are active
* **View Transactions**: See all payments made through each button
* **Edit Button**: Update button configuration
* **Enable/Disable**: Activate or deactivate buttons as needed
## Button Embed Preview
 *Screenshot showing how the button appears on a website - Coming soon*
## Next Steps
For fixed amount payments with shareable links
For formal invoice-style payments
For full API integration and customization
Set up real-time payment notifications
## Support
* **Technical integration help**: Email [merchant.support@payglocal.in](mailto:merchant.support@payglocal.in)
* **Business inquiries**: Contact your PayGlocal account manager
* **Dashboard access**: Reach out to your account manager for credentials
*Screenshot showing how the button appears on a website - Coming soon*
## Next Steps
For fixed amount payments with shareable links
For formal invoice-style payments
For full API integration and customization
Set up real-time payment notifications
## Support
* **Technical integration help**: Email [merchant.support@payglocal.in](mailto:merchant.support@payglocal.in)
* **Business inquiries**: Contact your PayGlocal account manager
* **Dashboard access**: Reach out to your account manager for credentials