> ## Documentation Index
> Fetch the complete documentation index at: https://docs.payglocal.in/llms.txt
> Use this file to discover all available pages before exploring further.
# Payment Link
> Create and share payment links for quick, one-time payments without API integration.
## What is a Payment Link?
A **Payment Link** is a shareable URL that lets you collect payments without any coding or API integration. Create a link in the GCC dashboard, share it with your customer via email, SMS, or WhatsApp (domestic) or email (international), and they complete payment on PayGlocal’s secure hosted checkout page.
## How to Create a Payment Link
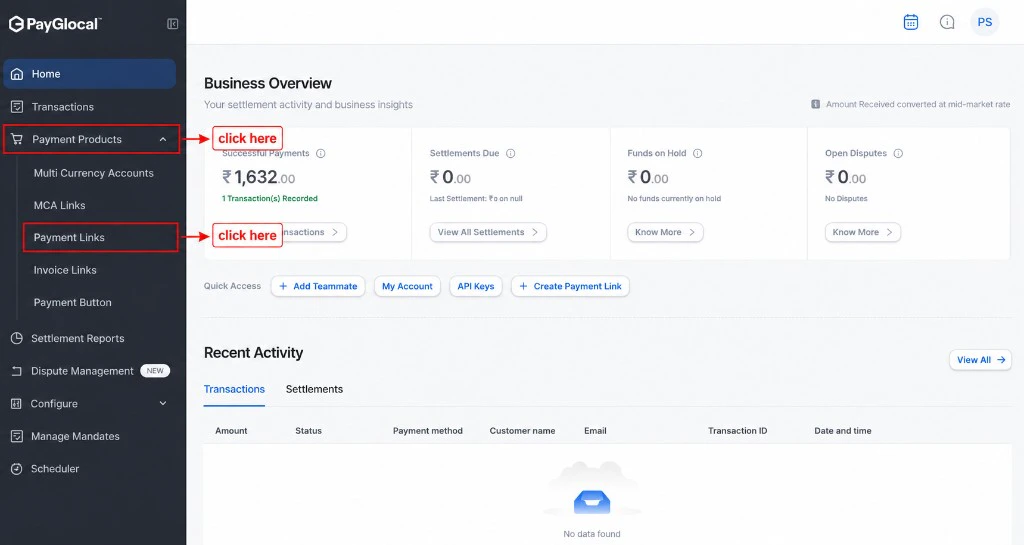
Log in to the [GCC dashboard](https://merchant.payglocal.in) and click on **Payment Links** in the left sidebar under **Payment Products**.
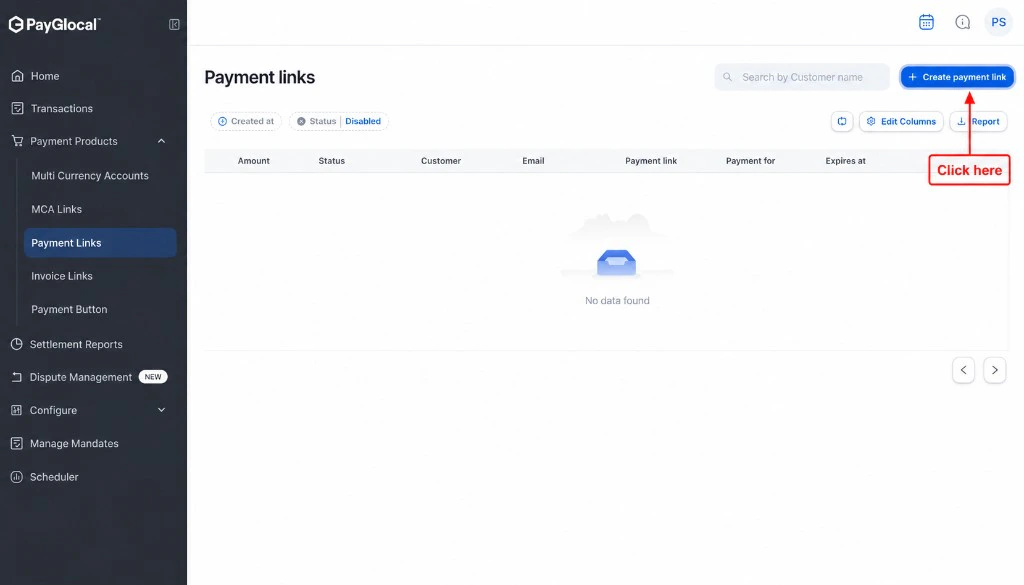
You'll see the Payment Links management page where you can view all your existing links and create new ones.
Click the **+ Create payment link** button in the top right corner to open the payment link creation form.
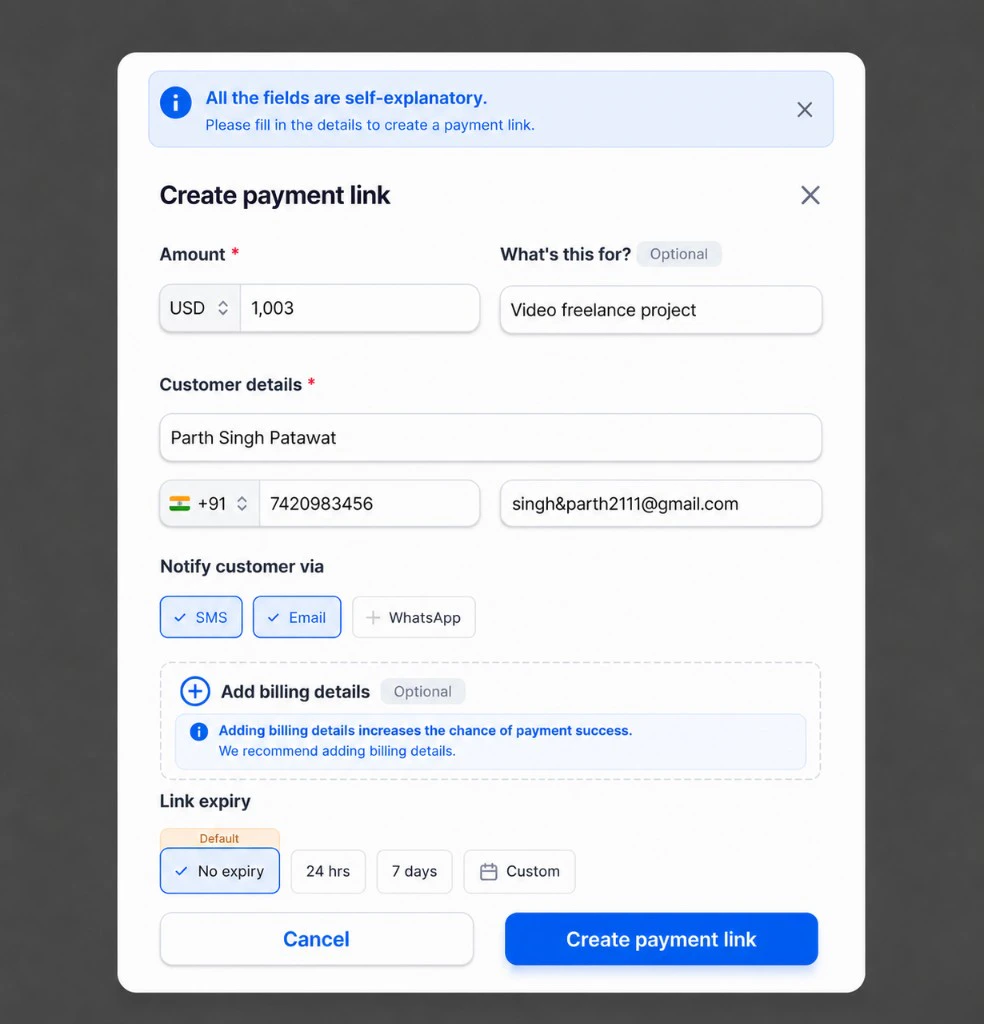
Complete the payment link form with the following information:
After filling all required fields, click the **Create payment link** button at the bottom of the form.
Once generated, the system will:
* Display the Payment Link ID (PLID) and shareable URL
* Automatically send the link to the customer's email and/or mobile (based on your selection)
* Allow you to copy the URL and share it through any other channel
**Customer Notifications**:
* **International Customers**: Notifications are sent via **Email only**
* **Domestic Customers** (India): Notifications are sent via both **Email and SMS/WhatsApp**
This ensures customers receive timely updates about their payment links and transaction status through the most appropriate channels based on their location.
Monitor payment attempts, link status, transaction details, and customer information in real time from the Payment Links dashboard.
## Payment Link Status
Your payment links can have the following statuses:
| Status | Description |
| -------------- | ------------------------------------------------------- |
| **Active** | Link is live and ready to accept payments |
| **Transacted** | A successful payment has been completed using this link |
| **Exhausted** | The link has reached the maximum of 10 payment attempts |
| **Expired** | The link's expiry time has passed |
| **Disabled** | You manually disabled the link from the dashboard |
Customers can attempt payment on a Payment Link up to **10 times**. After 10 failed attempts, the link status automatically changes to **Exhausted** and cannot be used anymore. Create a new payment link if needed.
## Customer Experience
When a customer receives and clicks on a payment link:
1. **Link Opens**: The customer is directed to PayGlocal's secure hosted checkout page
2. **Information Review**: Customer reviews the payment amount, description, and merchant details
3. **Payment Details**: Customer enters their payment method details (card, UPI, net banking, etc.)
4. **Authentication**: For card payments, the customer completes **3D Secure (3DS)** verification on the issuer’s page — an extra check to confirm the cardholder. For some domestic flows, an **OTP** may also be required. Together, these steps help prevent fraud on card transactions.
5. **Confirmation**: Customer receives instant confirmation of payment success or failure
6. **Receipt**: PayGlocal sends a payment receipt to the customer's email/mobile
## Next Steps
Learn about invoice-style payment requests
Embed payment buttons on your website
Learn more about the GCC dashboard
## Support
* **Business and product questions**: Contact your PayGlocal account manager
* **Technical issues or errors**: Email [merchant.support@payglocal.in](mailto:merchant.support@payglocal.in)
* **Dashboard access**: Reach out to your account manager for credentials